Rotary table bearings ARL-E® – Details
Product information
Product description
Suffix
Tolerances
Design of adjacent construction
Product table ARL-E®
Product information
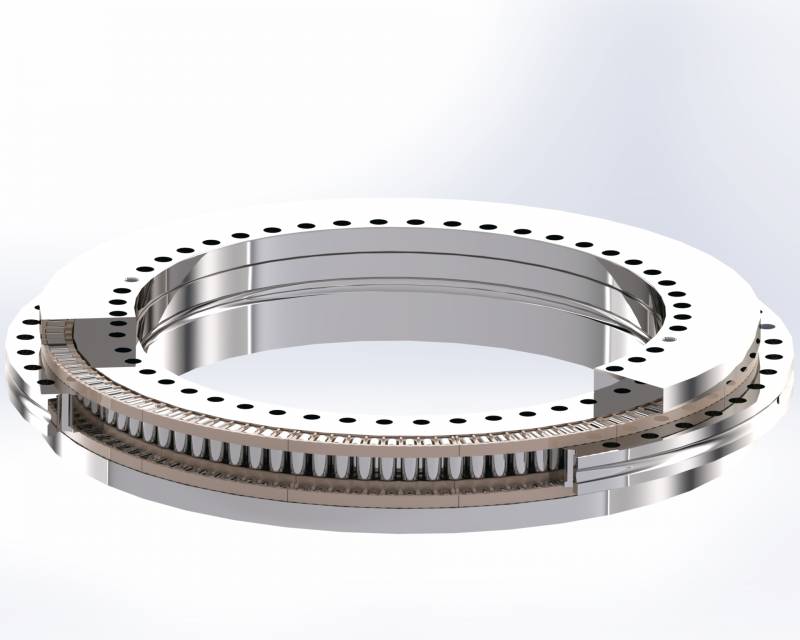
The axial-radial cylindrical roller bearing of the ARL-E® series from IBO is a roller bearing ideally suited for the application in rotary tables and rotary tables for machine tools. With the introduction of the E version, IBO offers a product that represents the state of the art in the field of rotary table bearings.
The axial-radial bearings are two-sided working rolling bearings and have a screw connection with a guiding radial rolling bearing. These ready-to-install pre-greased units have a high degree of rigidity, high load rating and work particularly precisely. These rolling bearings absorb radial and axial forces from both directions and have zero backlash tilting moments. With the E version (ARL-E®), IBO offers improved rigidity and friction torque. The bearings of the ARL-E series are suitable for operating temperatures of -30° C and 120° C.
IBO manufactures the ARL-E® series for shaft diameters from Ø80 to Ø580 mm.

Product description
Axial-radial cylindrical roller bearings of the ARL-E®) series consist of a two-sided working axial cylindrical roller bearing and a radial cylindrical roller bearing.
The axial bearing system consists of:
- Two axial roller and cage assemblies
- Housing washer (outer ring)
- L-bracket (inner ring)
- Shaft washer
The axial raceway system is backlash-free (zero clearance) when installed.
The zero-clearance radial bearing system consists of a radial roller and cage assembly.
Through-holes are provided in the outer ring, in the L-bracket and in the shaft washer for fastening in the adjacent construction.
The shaft washer and L-bracket are secured with two retaining screws for the transport.
All bearings of the ARL-E® series are delivered factory-lubricated with the grease according to the specs.
Suffix
The following standard designs are defined for the axial-radial cylindrical roller bearings in the E version (ARL-E):

Tolerances

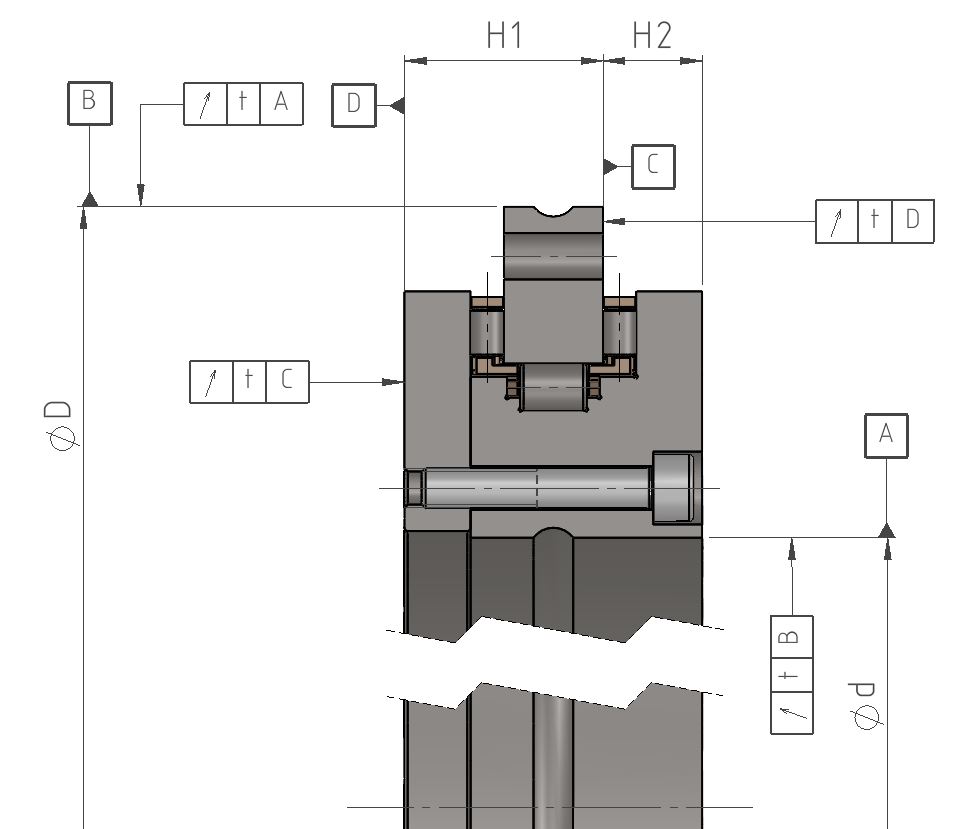
The diameter tolerances for the ARL-E® series correspond to the tolerance class P5 and the tolerances for the running accuracy correspond to tolerance class P4 according to WN001. The following table shows the corresponding values for each bore diameter:
| Inner-Ø d [mm] | Δdmp [mm] | Outer-Ø D [mm] | ΔDmp [mm] | Height H1 H1 [mm] | t H1s [mm] | Height H2 H2 [mm] | t H2s [mm] | Axial / Radial run out Standard [µm] | PR50 [µm] |
|---|---|---|---|---|---|---|---|---|---|
| 80 | -0.009 | 146 | -0.011 | 23.35 | ±0.025 | 11.65 | ±0.02 | 3 | 1.5 |
| 100 | -0.01 | 185 | -0.015 | 25 | ±0.025 | 13 | ±0.02 | 3 | 1.5 |
| 120 | -0.01 | 210 | -0.015 | 26 | ±0.025 | 14 | ±0.02 | 3 | 1.5 |
| 150 | -0.013 | 240 | -0.015 | 26 | ±0.03 | 14 | ±0.02 | 3 | 1.5 |
| 180 | -0.013 | 280 | -0.018 | 29 | ±0.03 | 14 | ±0.025 | 4 | 2 |
| 200 | -0.015 | 300 | -0.018 | 30 | ±0.03 | 15 | ±0.025 | 4 | 2 |
| 260 | -0.018 | 385 | -0.02 | 36.5 | ±0.04 | 18.5 | ±0.025 | 6 | 3 |
| 325 | -0.023 | 450 | -0.023 | 40 | ±0.05 | 20 | ±0.025 | 6 | 3 |
| 395 | -0.023 | 525 | -0.028 | 42.5 | ±0.05 | 22.5 | ±0.025 | 6 | 3 |
| 460 | -0.023 | 600 | -0.028 | 46 | ±0.06 | 24 | ±0.03 | 6 | 3 |
| 580 | -0.025 | 750 | -0.035 | 60 | ±0.075 | 30 | ±0.03 | 10 | 5 |
Design of adjacent construction
The concept and design of the connecting construction for bearings of the ARL-E series can have a negative impact on the bearing properties, such as:
- Running accuracy
- Preload (negative clearance)
- Frictional torque behavior
The following parameters are mandatory for the connecting construction.
The figure shows the required characteristic values for the shaft seat:

Design of the connecting construction for the bearing seat on the shaft
| Shaft-Ø d [mm] above | incl. | Tolerance Δdmp [µm] | Roundness t2 [µm] | Parallelism t3 [µm] | Squareness t1 [µm] | |
|---|---|---|---|---|---|---|
| 50 | 80 | 0 | -13 | 3 | 1.5 | 3 |
| 80 | 120 | 0 | -15 | 4 | 2 | 4 |
| 120 | 180 | 0 | -18 | 5 | 2.5 | 5 |
| 180 | 250 | 0 | -20 | 7 | 3.5 | 7 |
| 250 | 315 | 0 | -23 | 8 | 4 | 8 |
| 315 | 400 | 0 | -25 | 9 | 4.5 | 9 |
| 400 | 500 | 0 | -27 | 10 | 5 | 10 |
| 500 | 630 | 0 | -32 | 11 | 5.5 | 11 |
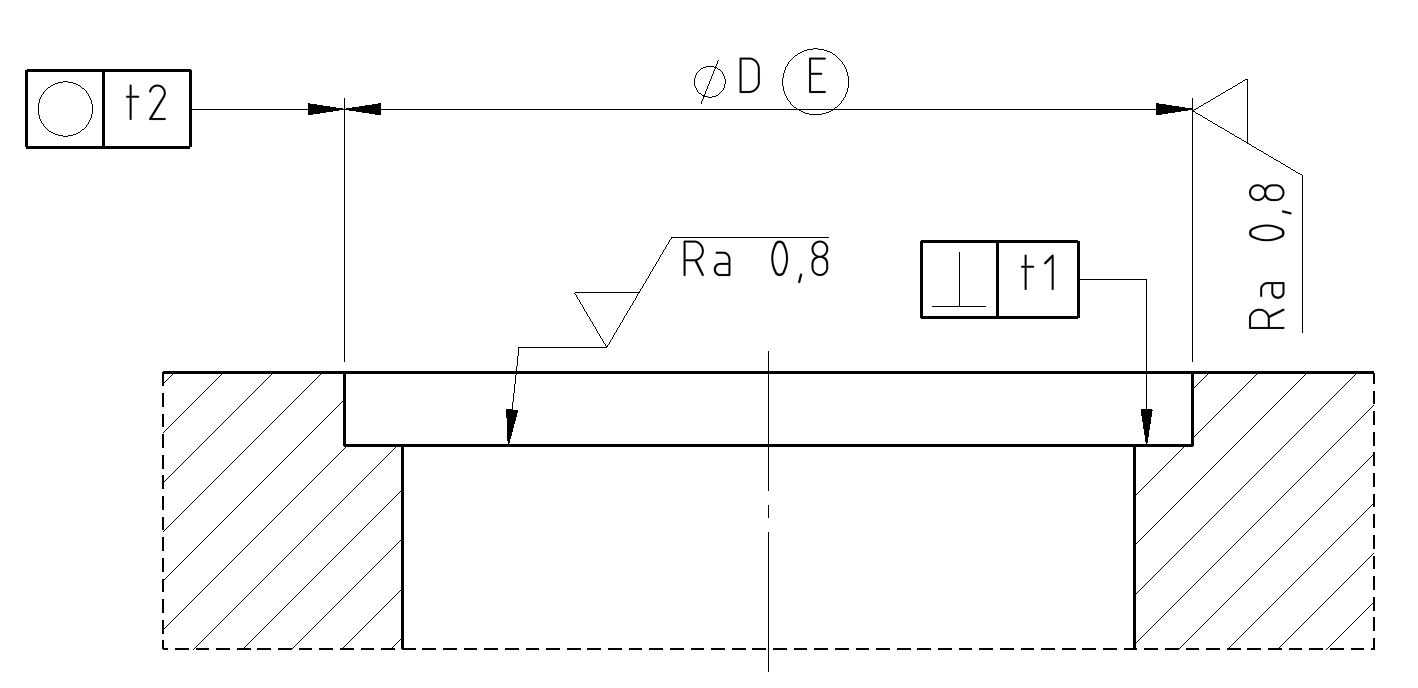
The requirements for the housing washer must be designed according to the following figure:

Design of the connection construction for the bearing seat in the housing
| Housing-Ø d [mm] above | incl. | Tolerance Δdmp [µm] | Roundness t2 [µm] | Squareness t1 [µm] | |
|---|---|---|---|---|---|
| 120 | 180 | 0 | -13 | 5 | 5 |
| 180 | 250 | 0 | -15 | 7 | 7 |
| 250 | 315 | 0 | -18 | 8 | 8 |
| 315 | 400 | 0 | -20 | 9 | 9 |
| 400 | 500 | 0 | -23 | 10 | 10 |
| 500 | 630 | 0 | -25 | 11 | 11 |
| 630 | 800 | 0 | -27 | 13 | 13 |
| 800 | 1,000 | 0 | -32 | 15 | 15 |
Product table ARL-E®
| Symbol | d [mm] | Δdmp [mm] | D [mm] | ΔDmp [mm] | H [mm] | H1 [mm] | t H1s [mm] | H2 [mm] | t H2s [mm] | Axial & Radial run out [µm] | Axial & Radial run out PR50 [µm] |
|---|---|---|---|---|---|---|---|---|---|---|---|
| ARL-E80.00 | 80 | -0.009 | 146 | -0.011 | 35 | 23.35 | ±0.025 | 11.65 | ±0.02 | 3 | 1.5 |
| ARL-E100.00 | 100 | -0.01 | 185 | -0.015 | 38 | 25 | ±0.025 | 13 | ±0.02 | 3 | 1.5 |
| ARL-E120.00 | 120 | -0.01 | 210 | -0.015 | 40 | 26 | ±0.025 | 14 | ±0.02 | 3 | 1.5 |
| ARL-E150.00 | 150 | -0.013 | 240 | -0.015 | 40 | 26 | ±0.03 | 14 | ±0.02 | 3 | 1.5 |
| ARL-E180.00 | 180 | -0.013 | 280 | -0.018 | 43 | 29 | ±0.03 | 14 | ±0.025 | 4 | 2 |
| ARL-E200.00 | 200 | -0.015 | 300 | -0.018 | 45 | 30 | ±0.03 | 15 | ±0.025 | 4 | 2 |
| ARL-E260.00 | 260 | -0.018 | 385 | -0.02 | 55 | 36.5 | ±0.04 | 18.5 | ±0.025 | 6 | 3 |
| ARL-E325.00 | 325 | -0.023 | 450 | -0.023 | 60 | 40 | ±0.05 | 20 | ±0.025 | 6 | 3 |
| ARL-E395.00 | 395 | -0.023 | 525 | -0.028 | 65 | 42.5 | ±0.05 | 22.5 | ±0.025 | 6 | 3 |
| ARL-E460.00 | 460 | -0.023 | 600 | -0.028 | 70 | 46 | ±0.06 | 24 | ±0.03 | 6 | 3 |
| ARL-E580.00 | 580 | -0.025 | 750 | -0.035 | 90 | 60 | ±0.075 | 30 | ±0.03 | 10 | 5 |
